• Home
  • About
  • Portfolio
  • Shop
  • Collaboration
  • Imprint
Bloglovin
Instagram
Pinterest
Facebook
Twitter
Contact

Luloveshandmade

Crafts, colors & everyday life happiness

  • DIY
  • Handlettering & Illustration
  • Outfits
  • Recipes
  • Parties
  • Videos
  • Fashion and Portrait Photo Shootings in Berlin: New Colorful Photos with Anna in my Portfolio
    Fashion and Portrait Photo Shootings in Berlin: New Colorful Photos with Anna in my Portfolio
  • All Boobs Are Beautiful - Charity Shirt with NUDE x Luloveshandmade
    All Boobs Are Beautiful - Charity Shirt with NUDE x Luloveshandmade
  • DIY: Road Trip Embroidery Hoop Wall Decor
    DIY: Road Trip Embroidery Hoop Wall Decor
  • DIY: Wooden Geometrical Necklaces
    DIY: Wooden Geometrical Necklaces
  • DIY: Longboard Handlettering Project
    DIY: Longboard Handlettering Project
  • Dinosaur Photo Fun and Portrait Shooting in Berlin
    Dinosaur Photo Fun and Portrait Shooting in Berlin
  • Potsdam Guide 2.0
    Potsdam Guide 2.0
  • A Colorful Summer Craft Party
    A Colorful Summer Craft Party
  • DIY: Sewing Tutorial for a Sleepover Purse
    DIY: Sewing Tutorial for a Sleepover Purse
  • A Little Love Letter to my Menstrual Cup
    A Little Love Letter to my Menstrual Cup
Recipes

Strawberry-Mint Milkshake

July 11, 2013


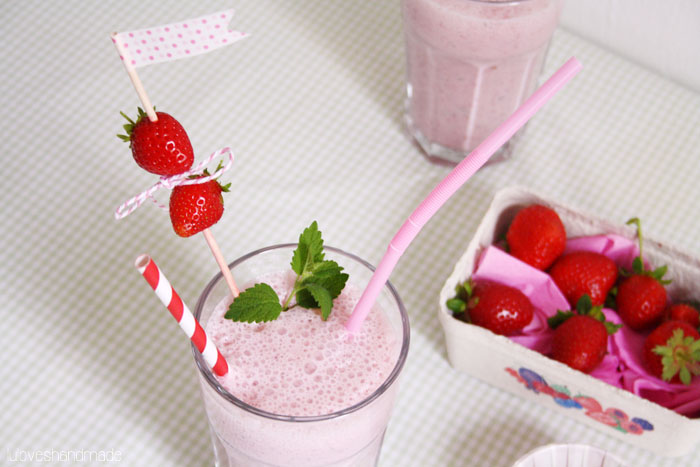
Hello and happy summer day! :) Here’s a super refreshing summer milkshake recipe for you! :) This shake is rather simple and can be made in only a few minutes, but since I’m currently working really hard on improving my photography skills and trying to get to know my camera better, I use every occasion to excercise and shooting a summer milkshake was perfect for this. :)

You need:
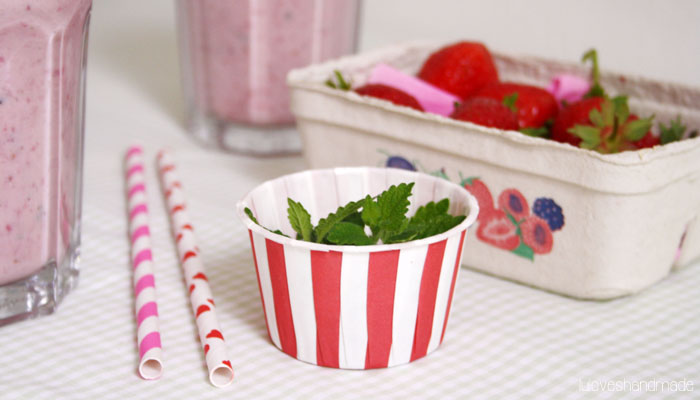
– Fresh strawberries
– Fresh mint
– Milk
– Some joghurt
– Vanilla sugar
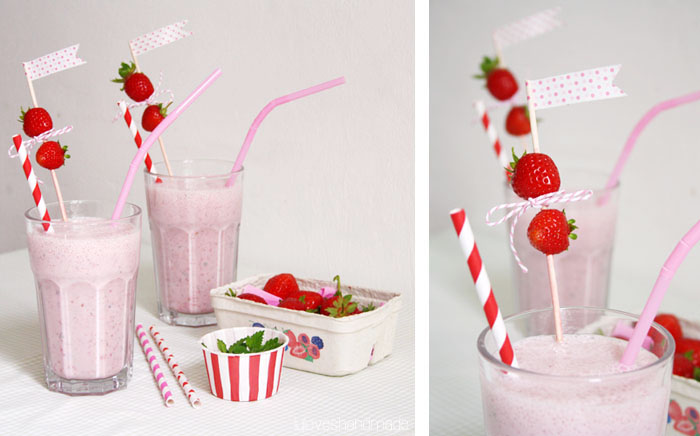
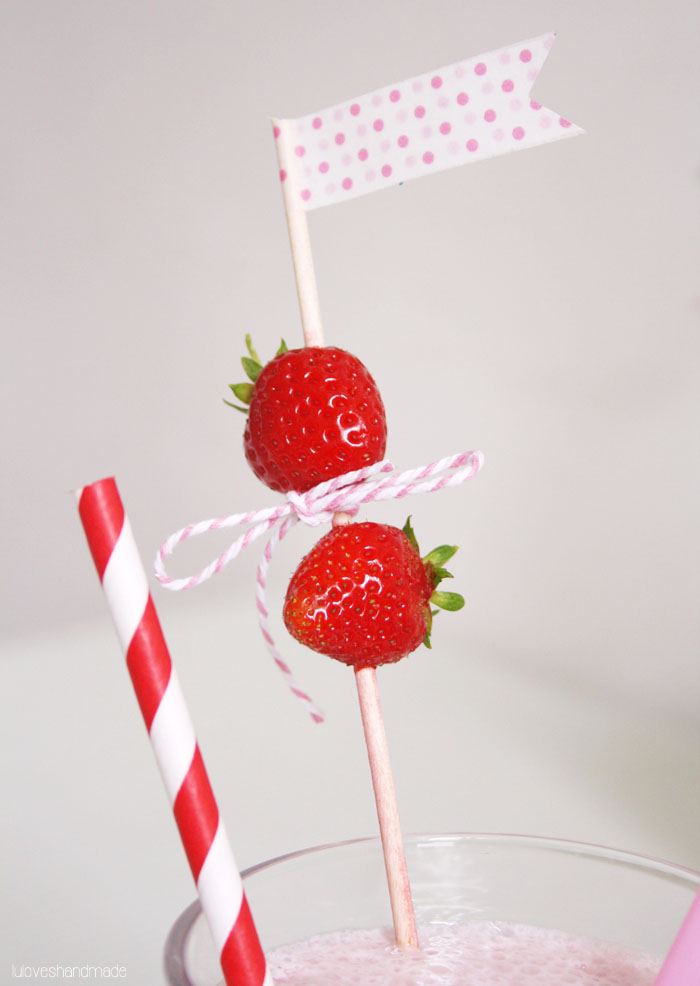
– Optional: paper straws, tape and wooden sticks for decor

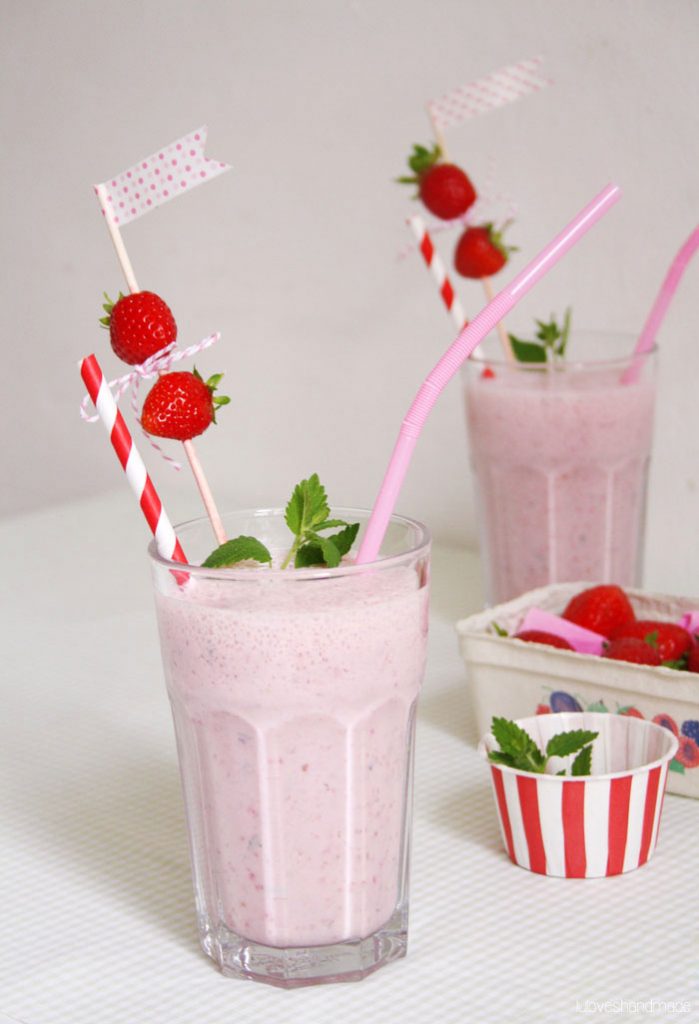
Simply put strawberries, mint leaves, milk, some joghurt and vanilla sugar into a mixer, mix and mash all ingredients until your shake has the consistency that you prefer and that’s it. You could also add raspberries or other kinds of fruits, but my favorite one is this strawberry-mint shake. :)
Enjoy!


Merken

Merken

by luloveshandmade 
5 Comments
DIY

DIY with KAMSnaps: Fabric Bow Belt

July 8, 2013


Hello, hello! :) Remember my four past DIYs using KAMSnaps that I have been posting since April? :) I shared a tutorial for how to sew a fabric bow bracelet, a tutorial for a faux leather business card holder, a DIY for a cat felt needle case and a DIY for a pillow case. Today I want to share the final post out of five parts of the series called “5 things to do
with KAMSnaps” featuring the awesome products of my sponsor Snaply
who sent me a package with lots of awesome things from their shop that
I’ve chosen in order to show you what to make with their products.

As I just said, this tutorial is part five of the blog posts telling
you what
to use KAMSnaps for. These are colorful plastic snaps which you can use
for many different projects and they are so useful. So here’s my
idea, a sewing DIY for how to make a super cute fabric bow belt which
you can then close with the snaps and wear it with your favorite
dresses. :) Have fun!

This is what you need:
– A piece of fabric, fourth times as wide as you later want the belt to be and as long as your circumference of waist plus 10cm (to close it)
– A piece of interfacing (in German: eine dünne Schabracke) with the same measurements to give your belt more stability
– Two pieces of fabric (for the front and back) with the size of your bow plus 1cm seam allowance
– Also for the bow: two pieces (or one thick piece) of interfacing / batting with the size of your bow to give it some volume
– A final piece of fabric to attach your bow to the belt, about 8cm x 12cm
– Sewing machine, ironing board and hot iron
– KAMSnaps, a KAMSnap plier and a bradawl
– Scissors and magic pen
– Optional and really helpful: a cutting pad and a roll cutter

At first, use the roll cutter and your cutting pad to cut out the long piece of fabric for the belt itself. Mine was 12cm wide (fourth times as wide as I later wanted the belt to be) and 95cm long (85cm for my circumference of waist plus 10cm to close it). Then cut out a piece of interfacing of the same size. Next (as seen on the lower left photo), cut out the pieces for the bow (front and back plus interfacing) and the piece of fabric (the right one on the lower left photo) which you will use to attach the bow to the belt.
You then have cut out all the pieces that you need (as can be seen on the lower right photo): The long piece of fabric for the belt itself and a piece of interfacing of the same size, front and back fabric part for the bow plus interfacing and one piece of fabric to attach the bow to the belt.

Next, put all layers of the bow onto each other (front and back plus one or two layers of interfacing) so that the two fabric layers are facing each other with the right side. Next, sew all layers onto each other and leave an opening in the middle of one of the longer sides (between my finger, shown on the photos). Then cut off the edges so that you can then easily turn the inside out. Iron.

This is how it now should be looking now! Next, use your sewing machine and top stitch to close the opening. Afterwards, fold your piece of fabric to make it a bow and use a matching thread to wrap it around and to bind it. As a next step, take the small piece of fabric which will be used to attach the bow to the belt: fold it lengthwise and iron. Fold it another time so that the edges are now in the middle and you don’t see them anymore. Iron again.

Now use your sewing machine to topstitch along the edges of the piece of fabric. Now you have this piece and your bow which is half finished. Next, take the long piece of fabric for the belt, iron it, put the interfacing on top and iron it onto the fabric. Then fold the edges to the middle and then fold the whole belt lenghtwise so that it then has the width that you wanted and that you can’t see the edges anymore. Iron the belt.

Next, again use your topstitch to neaten the edges and to sew all layers onto each other and carefully close the short endings. You then should have three pieces looking like on the top right photo. Afterwards, put your bow onto the belt and wrap the small strap around both of them. Close the opening with your sewing machine and use a zig zag stitch to carefully neaten the edge.

The turn the fabric strap inside out so that it looks more pretty. Your bow is ready! :) Now there’s only one final step to be done: take the bradawl to get holes into the back part of the belt where both layers are supposed to overlap and then use your KAMSnap plier to attach the snaps to the belt (according to the instructions on its package). I made several rows so that I can always adjust the length of the belt. :)
That’s it, you are done!

Congratulations, you now have your own handmade fabric bow belt!

I totally adore the final result and the great color matching my floral summer dress!

Happy sewing, can’t wait to see your cute bow belt!
Lu

Merken

by luloveshandmade 
15 Comments
Everything Else

Hello, new sponsors & cooperation partners!

July 1, 2013


Hello, hello! It’s July and I would love to welcome my new blog sponsors and cooperation partners for this month! :)
I’m really happy to welcome those brands and indie businesses (again) for advertising on my blog and / or for one or another great cooperation about which I am going to write quite soon. :)

idee. der creativmarkt – My favorite place for craft supplies
Snaply Nähkram – Sewing supplies and awesome snaps
Frau Fadenschein – Pretty book cases and crochet accessories
Fashion for Home – Great furniture
Koo – My favorite geometric necklaces
partyerie – The best accessories for throwing a party
shootbags – Beautiful camera bags
blütezeit berlin – Stylish streetwear from Berlin

Happy shopping and I’m soon going to show you more of this month’s cooperations! :)
Lu

by luloveshandmade 
1 Comment
Outfits

What I wore: Green & Pink

June 29, 2013


Green pullover: c/o Blütezeit Berlin
Skirt: h&m
Tights: primark
Necklace: handmade
Camera tote bag: handmade (available here)
Kitty sneakers: handpainted
Headscarf: unknown

Hello! :) Here’s a new outfit of which I recently took photos with Flo and Mogli. I love the combination of pink and green and I especially love with new hoodie I got from Blütezeit Berlin for a cooperation. :) It’s made of 100% cotton, it is super comfortable and has the most awesome hood ever! I’m soon going to tell you more about this great indie label from Berlin.
From time to time I step out of my normal comfort zone which means mostly wearing dresses and try out something new and I really like this casual street style look. What do you think? :)
The necklace and the bag are handmade, the camera tote can be bought here in my shop. :)
The black and white star head scarf is an accessory I have been owning for a really long time and I’m always super happy when a piece I’ve been keeping for a while without wearing it then comes into usage again. :)
If you want to learn how to make those shoes, too, check out my kitty sneaker DIY. :)
Happy weekend!
Lu


by luloveshandmade 
9 Comments
DIY

DIY: Easy Mini Notebook

June 26, 2013


Hello, hello! I’m a huge fan of crafty projects that you can easily do with things you have at home anyway and don’t have to buy lots of stuff when you spontaneously feel the desire to create something pretty. This tutorial is one of those things. :)


For this notebook DIY, you simply need to gather your masking tapes, pretty stationery, paper and some other supplies I bet that most of you have at home.

So here’s exactly what you will need:
– Some sheets of white paper
– Colorful / patterned paper or cardboard (not too thick)
– Needle and yarn
– A (handmade) stamp and an ink pad
– A cut ruler (or at least normal scissors and a ruler, but this needs more time and accuracy)

Use your stamp and the ink pad to stamp the bottom of each page with a motif to make the pages more special and to add a personal touch to this project. Next, after the ink has dried, put all sheets of white paper (the amount depends on how many pages you want to have) onto each other. Then cut out the patterned paper (this is what I used the cut ruler for) so that it has the same size and use it as cover. Fold all sheets in the middle and use yarn and needle to sew them together in the middle. Make a bow to make it even prettier.

That’s it! You can even add pretty labels or other details and embellishment and make matching gift tags or postcards with the same paper.
Those easy little notebooks are perfect as last-minute gift idea or as content for a goodie bag or tiny thank you present.
Have fun making your own ones in all different sizes and colors! :)
Lu

Merken

by luloveshandmade 
12 Comments
« Previous Page
Next Page »

Hello & Welcome

Hello & Welcome

I'm Lu, I'm 34 years old and I live in wonderful Berlin. I am a Content Creator and DIY enthusiast and I am the founder and editor of Luloveshandmade.com where I share colorful everyday life happiness, handletterings, tutorials and other creative content. Apart from being a Handlettering Artist and running my own indie business, I'm a Content & Communications Manager. Read more about me and my creative work or visit my business portfolio page and have fun exploring this blog.

Get Inspired

  • Luloveshandmade-Handlettering-Feminism-Feminismus-Pro-Choice-Weg-mit-219a-bunt

    Pro Choice // Weg mit Paragraf 219a!

    January 24, 2021
  • Luloveshandmade-Shop-Update-Illustration-Handlettering-Spreadshirt-1

    Luloveshandmade Shop Update – New Products with my Letterings and Illustrations via Spreadshirt

    October 19, 2020
  • Luloveshandmade-Handlettering-Illustration-Make-Periods-Table-Talk-Menstruation-Feminism

    Make Periods Table Talk

    September 11, 2020
  • Luloveshandmade-Uncle-M-Music-All-Boobs-Are-Beautiful-6

    All Boobs Are Beautiful – Special Limited Edition Shirt via Uncle M Music Shop

    July 24, 2020
  • Luloveshandmade-Free Handlettering Printable-We Will All Make It Through All Of This (1)

    Free Handlettering Printable: We’ll Make It Through This

    April 13, 2020

Tags

advice balcony berlin guide christmas cities diy fake polaroid fashion favorite blogs favorite indie label favorite restaurants and cafes favorite shops featured fellow bloggers feminism food and cooking food table freebie giveaway handlettering handmade home decoration home tour instagram instagram photo printing service life and friends list lomography longboarding makeover market news painting and drawing party photography potsdam guide pretty online finds recipe review selling sewing shopping sponsoring travel video vintage what I wore wishlist
...
Followers
Follow
...
Followers
Follow
...
Fans
Like
...
Followers
Follow
...
Posts
0
...
amazing followers

My favorite Posts

  • A Colorful Portrait Shooting (& Advice for How to Prepare for It)
    A Colorful Portrait Shooting (& Advice for How to Prepare for It)
  • Our Sweet And Happy Croatia Adventure // Summer Holidays on Brač
    Our Sweet And Happy Croatia Adventure // Summer Holidays on Brač
  • Handlettering for Beginners (with Pinterest) & Valentine
    Handlettering for Beginners (with Pinterest) & Valentine's Day Printables
  • Handlettering Workshop Recap
    Handlettering Workshop Recap
  • Pinterest Basics for Bloggers
    Pinterest Basics for Bloggers

English: Imprint // Data Protection
German: Impressum // Datenschutzerklärung

Copyright © 2025 · Prima Donna theme by Georgia Lou Studios

© 2010 - 2017 luloveshandmade · Theme by Georgia Lou Studios, adapted by kathastrophal.de.