• Home
  • About
  • Portfolio
  • Shop
  • Collaboration
  • Imprint
Bloglovin
Instagram
Pinterest
Facebook
Twitter
Contact

Luloveshandmade

Crafts, colors & everyday life happiness

  • DIY
  • Handlettering & Illustration
  • Outfits
  • Recipes
  • Parties
  • Videos
  • DIY: Longboard Handlettering Project
    DIY: Longboard Handlettering Project
  • All Boobs Are Beautiful - Charity Shirt with NUDE x Luloveshandmade
    All Boobs Are Beautiful - Charity Shirt with NUDE x Luloveshandmade
  • Free Printable: Handlettering Calendar 2019
    Free Printable: Handlettering Calendar 2019
  • Dinosaur Photo Fun and Portrait Shooting in Berlin
    Dinosaur Photo Fun and Portrait Shooting in Berlin
  • A Little Love Letter to my Menstrual Cup
    A Little Love Letter to my Menstrual Cup
  • DIY: Wooden Geometrical Necklaces
    DIY: Wooden Geometrical Necklaces
  • DIY Gift Ideas
    DIY Gift Ideas
  • DIY: Road Trip Embroidery Hoop Wall Decor
    DIY: Road Trip Embroidery Hoop Wall Decor
  • A Colorful Summer Craft Party
    A Colorful Summer Craft Party
  • Fashion and Portrait Photo Shootings in Berlin: New Colorful Photos with Anna in my Portfolio
    Fashion and Portrait Photo Shootings in Berlin: New Colorful Photos with Anna in my Portfolio
Everything Else

Pink Marshmallow Christmas Decor

December 5, 2011

Hi, there! My name is Amy and I blog over at amyistheparty.  I live in a cute vintage Midtown apartment in Sacramento, CA. My style could be described as vintage modern (a little bit vintage, a little bit modern). A self-proclaimed dork and hostess with the mostess, I spend my free time decorating, searching for vintage treasures, exploring new places, making and designing jewelry and websites, and drinking an absurd amount of coffee.I am honored that Lu asked me to be a part of her holiday blog party. The holidays are my absolute favorite time of year!

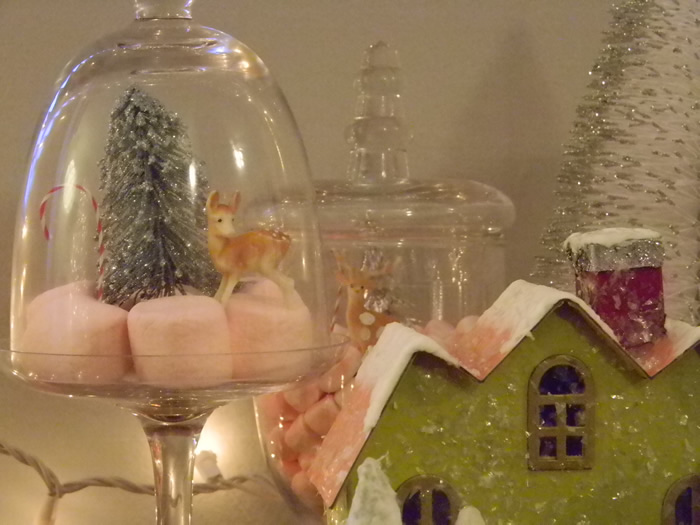
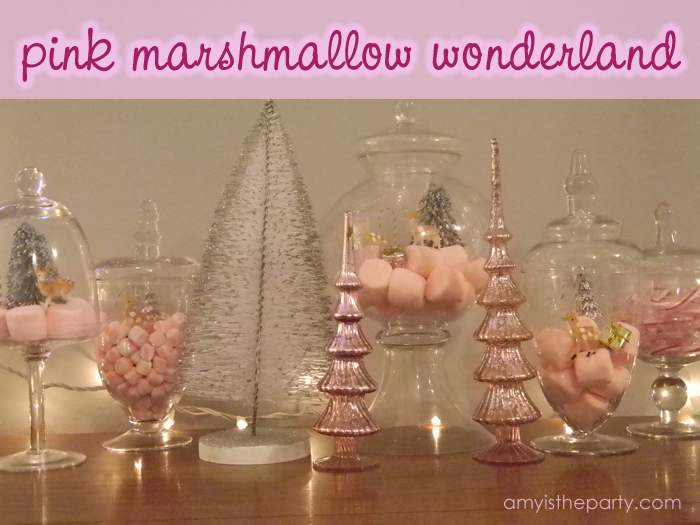
I got the pink marshmallow idea from a department store display. It is pretty inexpensive to make – especially if you already have some of the materials lying around. Ready?

You’ll need:
A collection of glass jars – I used apothecary jars but you could use mayo, pickle and jam jars and I bet it would look just as cute.
Pink marshmallows – I found these in my local discount grocery store. The large ones are strawberry flavored. The mini ones are peppermint.
Cake topper decorations, mini toys, mini trees, etc.Instructions:
The most challenging part of this project is finding cake toppers and toys that will look good in your jars. I already had the deer and small silver trees in my stash (originally purchased from bakeitpretty). I couldn’t find bottlebrush trees like I wanted so I purchased a couple of model trees (like for train sets) and I covered them in white glue and super-fine silver glitter.

A shop on etsy sells cute trees – or you might try your hand at dying your own (tutorial on craftyminx). There are tons of cute cupcake topper shops on Etsy too. This one sells trees, reindeers, and some adorable elves.

Fill the jars about 1/3 full with pink marshmallows. Stick each of your cake toppers into a marshmallow to insure it stays in place. Replace the lids on the jars once you have created a mini wonderland in each one. Arrange them all together for a magical display!

I hope you enjoyed my project idea and will come visit me at amy is the party. A big thank you to Lu for having me. Happy holidays!

***
Dear Amy, thank you for sharing this pretty tutorial! :) xo Lu

Merken

by luloveshandmade 
2 Comments
Everything Else

DIY: Knitted Christmas Wreath

December 4, 2011

Hello everybody! I’m Jennifer from wolkengleich. Some of you might know me from Lu’s last blog party. This time, I want to show you how to craft a lovely Christmas wreath. Currently, I’m totally in love with knitted accessories and decoration, so I decided to make one by myself. I really like this cozy look.
I hope the pictures are self-explanatory and you feel inspired to knit and craft. You also can omit the candle and hang-up the wreath on a wall or a window. I think it would look great!
I wish you a lovely Christmas season,
Jennifer
***
Thank you for sharing this pretty tutorial, Jenny! :)
Wish you all a nice 2nd Advent! While you are reading this, I’m standing at my booth at the Trend Mafia in Berlin, hopefully selling some handmade things. :) Wish me luck!
xo Lu

Merken

by luloveshandmade 
3 Comments
Everything Else

Trend Mafia Market Preparations 2011

December 3, 2011


Dear readers, as I’ve already posted, tomorrow, on Sunday, I’ll be having my own booth at the Trend Mafia designer market in Berlin! :) Among about 60 other vendors, I’ll be selling my handmade things. Those of you who have been reading my blog for a while know that I’ve been there last year and this time, I’ll try it again. :)
During the last days I’ve been completely busy with preparing everything. I sewed tons of new pouches, I oganized all my items, made price tags by hand, designed and printed new flyers and prepared every single detail. I’m a bit worried, because the weather forecast is so bad and it is to be feared that many people will rather stay at home than to go out for visiting a market. :(
I’m sooo ecxited, let’s see if I’ll be able to get some sleep tonight. Keep your fingers crossed for me that it will be a successful day, can’t wait to tell you everything and to share some photos. :)

In case you live in Berlin and don’t have any plans this Sunday, come and visit me at my booth, I’ll be happy to see some nice people! :) The location is called Hackesches Quartier and is next to the station Hackescher Markt. The market is open from 1-7 p.m and I’ll be sitting at booth number 10 in the back. :) More information can be found on the organizer’s page.

Wish you a lovely weekend, make sure to come back later, there’ll be another Christmas post on my blog! :)
Lu

by luloveshandmade 
1 Comment
Everything Else

Recipe: Vegan Baked Apple

December 3, 2011

Hi, I am
Trisha from MarySew and I am delighted to share my favorite recipe for baked
apples with you. It is super easy, takes
about 5 minutes to prepare and it’s totally animal friendly! :D


You’ll need (for 2 servings):
·        
2 Apples
·        
50-75g Marzipan
·        
3
tbsp Jam (I used homemade strawberry jam)
·        
A
hand full of raisins
·        
Vanilla


Preheat
your oven to 200°C. With a spoon carefully remove the apple core and seeds, make
sure you leave the bottom in. 


Mix the marzipan with the jam, vanilla and raisin
in a bowl. If you like you can also add cinnamon. It makes it more Christmas-y,
I know, but I don’t like cinnamon at all.

Fill the apples with the mixture, put
them in a small baking dish and bake for aprox. 25 minutes.

Serve hot!
We added dairy free vanilla yogurt, it was a delight. You can also use soy
vanilla sauce or just icing sugar.

Enjoy, have
an epic nom ^^.

***

Dear Trisha, thanks so much for sharing, this sounds delicious! :)
Dear readers, make sure to check out her blog, she sews amazing clothing for herself and sometimes provides you with great tutorials! :)
Lu

by luloveshandmade 
4 Comments
Everything Else

DIY: Christmas Stocking Sewing Tutorial

December 2, 2011


Eeeeks, hello! :) Here’s the second part of my Christmas blog party, a sewing project by me. :) I’m so happy about all the lovely guest bloggers participating this month and I’m glad about all the awesome feedback Steffi got for her post yesterday, thanks for commenting! :)
So here’s a tutorial for a Christmas stocking, in good time for St. Nicholas’ Day next Tuesday.
You need: Some fabric, a short piece of bias tape, a sewing machine and sewing accessories.


1. First, make yourself a draft for a stocking and then use it for cutting out fabric. You need 4 pieces of fabric of the same size, two with a pattern for the outside stocking, two plain pieces for the inner stocking which will later be rolled up.
2. Pin the two pieces of the patterned fabric and the two pieces of the plain fabric onto each other, the ‘good’ sides which are later supposed to be on the outside have to face each other.
3.+4. Next, sew the pieces onto each other (1cm / 0,39″ seam allowance), leaving out an opening at the top.


5. Then, cut out little pieces of fabric out of the seam allowances at the round parts of your stocking. This way, the stocking looks prettier and there’s enough space for the fabric after you’ve turned the stocking’s inside to the outside.
6. Put the two stockings – the patterned and the plain one – into each other, the ‘good’ sides facing each other.
7. Pin the two layers of fabric together at the top edge.
8. Sew the two stockings together at the top edge, leaving out a small opening to turn the two stockings inside out. I left this opening at the ‘back’ where there will later be the bias tape to hang up the stocking.


9.+10.+11. Here you can see the opening I left out.
12. Pulling them through the small opening, turn the two stockings which you’ve sewn together inside out.


13. That’s how it should now look like! :)
14. There’s the opening through which I’ve pulled the stockings.
15. Now put the plain stocking into the patterned stocking. This way, you have two layers and don’t see the seams.
16. Iron the top edges, this will make it easier to close the opening.


17.+18. Close the opening with pins and then close it with your sewing machine. Use a thread matching the colors of your stocking! :)


19. Yay, it already looks like a stocking! You’re almost done! :)
20. Now roll up the top of the stocking, turning the top part of the inner stocking to the outside. This way, your stocking looks more appealing and there’s a color contrast. :)


21. Now, pin a piece of bias tape to the back’s top edge.
22. Sew it onto the stocking.
23. This is how it should look like! <3
24. Yay, that’s it, you’re done! Here’s the pretty stocking! :)


Feel free to share a link if you try this yourself, can’t wait to see your colorful stockings! :)
In case you want me to provide this tutorial for a Christmassy guest post on your blog, just let me know and write me an email. :)
Wish you a lovely Christmas time, I’m looking forward to posting all the other pretty holiday projects during the next days.
Lu <3

Merken

Merken

by luloveshandmade 
4 Comments
« Previous Page
Next Page »

Hello & Welcome

Hello & Welcome

I'm Lu, I'm 34 years old and I live in wonderful Berlin. I am a Content Creator and DIY enthusiast and I am the founder and editor of Luloveshandmade.com where I share colorful everyday life happiness, handletterings, tutorials and other creative content. Apart from being a Handlettering Artist and running my own indie business, I'm a Content & Communications Manager. Read more about me and my creative work or visit my business portfolio page and have fun exploring this blog.

Get Inspired

  • Luloveshandmade-Handlettering-Feminism-Feminismus-Pro-Choice-Weg-mit-219a-bunt

    Pro Choice // Weg mit Paragraf 219a!

    January 24, 2021
  • Luloveshandmade-Shop-Update-Illustration-Handlettering-Spreadshirt-1

    Luloveshandmade Shop Update – New Products with my Letterings and Illustrations via Spreadshirt

    October 19, 2020
  • Luloveshandmade-Handlettering-Illustration-Make-Periods-Table-Talk-Menstruation-Feminism

    Make Periods Table Talk

    September 11, 2020
  • Luloveshandmade-Uncle-M-Music-All-Boobs-Are-Beautiful-6

    All Boobs Are Beautiful – Special Limited Edition Shirt via Uncle M Music Shop

    July 24, 2020
  • Luloveshandmade-Free Handlettering Printable-We Will All Make It Through All Of This (1)

    Free Handlettering Printable: We’ll Make It Through This

    April 13, 2020

Tags

advice balcony berlin guide christmas cities diy fake polaroid fashion favorite blogs favorite indie label favorite restaurants and cafes favorite shops featured fellow bloggers feminism food and cooking food table freebie giveaway handlettering handmade home decoration home tour instagram instagram photo printing service life and friends list lomography longboarding makeover market news painting and drawing party photography potsdam guide pretty online finds recipe review selling sewing shopping sponsoring travel video vintage what I wore wishlist
...
Followers
Follow
...
Followers
Follow
...
Fans
Like
...
Followers
Follow
...
Posts
0
...
amazing followers

My favorite Posts

  • Handlettering Workshop Recap
    Handlettering Workshop Recap
  • A Colorful Portrait Shooting (& Advice for How to Prepare for It)
    A Colorful Portrait Shooting (& Advice for How to Prepare for It)
  • Pinterest Basics for Bloggers
    Pinterest Basics for Bloggers
  • Our Sweet And Happy Croatia Adventure // Summer Holidays on Brač
    Our Sweet And Happy Croatia Adventure // Summer Holidays on Brač
  • Handlettering for Beginners (with Pinterest) & Valentine
    Handlettering for Beginners (with Pinterest) & Valentine's Day Printables

English: Imprint // Data Protection
German: Impressum // Datenschutzerklärung

Copyright © 2025 · Prima Donna theme by Georgia Lou Studios

© 2010 - 2017 luloveshandmade · Theme by Georgia Lou Studios, adapted by kathastrophal.de.