• Home
  • About
  • Portfolio
  • Shop
  • Collaboration
  • Imprint
Bloglovin
Instagram
Pinterest
Facebook
Twitter
Contact

Luloveshandmade

Crafts, colors & everyday life happiness

  • DIY
  • Handlettering & Illustration
  • Outfits
  • Recipes
  • Parties
  • Videos
  • DIY: Wooden Geometrical Necklaces
    DIY: Wooden Geometrical Necklaces
  • Dinosaur Photo Fun and Portrait Shooting in Berlin
    Dinosaur Photo Fun and Portrait Shooting in Berlin
  • Potsdam Guide 2.0
    Potsdam Guide 2.0
  • DIY: Sewing Tutorial for a Sleepover Purse
    DIY: Sewing Tutorial for a Sleepover Purse
  • DIY Gift Ideas
    DIY Gift Ideas
  • Happy Words - Free Handlettering Calendar Printable 2020
    Happy Words - Free Handlettering Calendar Printable 2020
  • Free Printable: Motivating Handletterings (and a Giveaway)
    Free Printable: Motivating Handletterings (and a Giveaway)
  • Fashion and Portrait Photo Shootings in Berlin: New Colorful Photos with Anna in my Portfolio
    Fashion and Portrait Photo Shootings in Berlin: New Colorful Photos with Anna in my Portfolio
  • What I Wore: Abandoned Swimming Pool
    What I Wore: Abandoned Swimming Pool
  • DIY: Road Trip Embroidery Hoop Wall Decor
    DIY: Road Trip Embroidery Hoop Wall Decor
Everything Else

Felt Christmas Garland

December 14, 2011


Hey Lu loves handmade readers, it’s
Stefanie from Squeaky Swing. I want to share with you my very easy Christmas
garland.
I was inspired by a sweet photo on this blog
and thought it would be a cute idea for decorating my home for Christmas. I’m
not sure how the original was made, but I decided to make my own garland with
felt letters. So here are the instructions:
Supplies:
– white felt (about 15x15cm  x 2 for each
letter)
– cotton wool to fill the letters
– glittery stones (from the arts and crafts
shop) and glue
– a big needle
– thread
– nylon thread


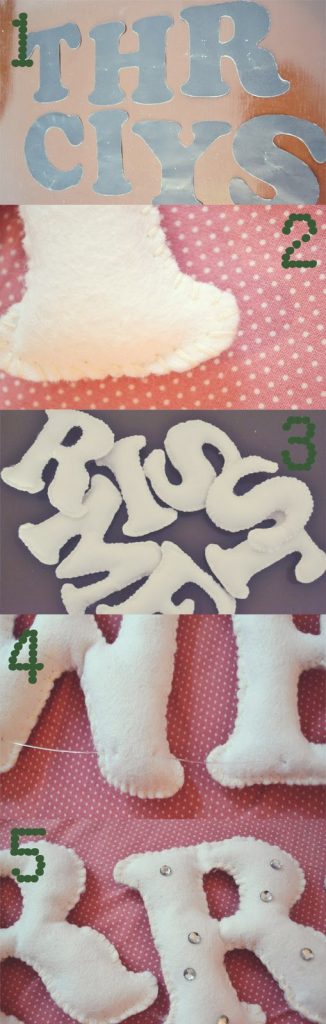
1. Print out the letters in any font you
like (I made them really big: two letters on one sheet), put them on the felt
and cut out each letter twice, front and back. M, R and S only have to be
printed once.
2./3. Sew the front and back of each letter
together, leaving a little space open to fill them. Then close the hole to
finish one letter. Repeat this with every letter.
4. Take the nylon thread to stitch the
letters together.
5. Finally glue little glittery stones onto
every second letter to give it the final touch.
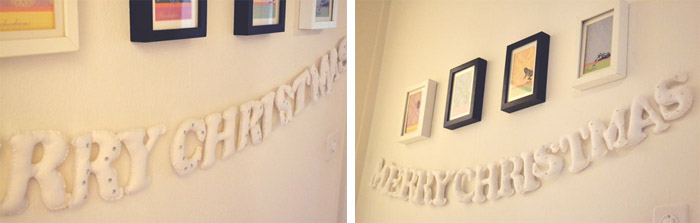
I hope you like it!
Merry Christmas, Stefanie
***
Dear Stefanie, thank you for sharing, this is so pretty! :)
Lu

Merken

by luloveshandmade 
6 Comments
Everything Else

Shop Discount on all Christmas Items

December 12, 2011


Yay, 15% discount on all Christmas items like stockings and present bags in my DaWanda shop. :)

by luloveshandmade 
1 Comment
Everything Else

Recipes: Candied Almonds

December 12, 2011

Hi everyone, thanks Lu
for letting me contribute to your Xmas blog party. 
I’m Heidi, I have the blog Imwithleia – I blog from Copenhagen with a focus on my love for handmade things. I’m sharing with you a recipe
for Candied Almonds. It’s a classic Scandinavian Xmas treat – nice and so
simple. The perfect little gift.
You need:
200 g Almonds
175g Powder sugar
2 tablespoons grounded cinnamon
10 cl water

Wash and dry the almonds, 10 minutes in the oven on 175 C
Mix powder sugar and cinnamon
Add it with the almonds and the water to a hot pan. Remember to stir all the
time. Continue to the sugar has melted and it smells a bit burned. Cool down on
some baking paper. Break a part. Enjoy

***
Eeeeks, thanks for sharing, it sounds soo delicious! :) Lu
by luloveshandmade 
Leave a Comment
Everything Else

Recipe: Punch Jelly

December 11, 2011


Hi there everybody!
I’m very honored to be invited as a guest author here on
„luloveshandmade“ today. I normally post over at “Fee ist mein Name” which means “Fee is my name” and that’s true, because…
well… Fee is my name !
I brought with me a little DIY combined with a yummy recipe:
Nonalcoholic punch jelly. I made these glasses as little presents for
my family and friends and everybody loved them. They can even be used
for storage when the jelly is all gone. So, here we go…


First, I did the crafting
part. I took a bunch of little jam glasses and spray painted the
lids gold. Take care that your spray paint is suitable for metal
undergrounds. I let mine dry for about 24 hours before taking the
next step: Gluing some decoration onto them. I chose cinnamon sticks,
dried orange slices and star anise. First, I tried hot glue, but it
dissolved the spray paint, so I switched to universal adhesive, which
worked out fine. Let the lids dry for another 24 hours before using
them.

For the jelly you need: 1
litre red grape juice, ½ litre apple juice, 1 big orange, 2 cinnamon
sticks, 6 cloves and 1kg jam sugar 2:1. Take a big pot and pour the
juice in. Squash the orange und pour its juice into the pot as well.
I use a tea filter to pour it through, to make sure that no pieces of
fruit make it into the pot. Then take a second tea filter, put the
cinnamon and the gloves in it, close it with a piece of thread and
put it inside of the juice. Bring to boil and let it simmer for about
30 minutes. Remove the spices and let the punch cool down.
Afterwards add the jam sugar, bring to boil again (with constant
stirring) and let cook at a rapid boil for one minute. If you wanna
test if it’s gelatinizing properly, take a cold plate and put a few
drops of your jelly on it. Hold the plate upright and if the jelly
starts thickening fast and sticks to the plate you can pour it from
the pot into your prepared jam glasses. Close the lids quickly, but
be careful not to damage your decoration. The jelly should be cold
and ready for consumption after a few hours.
A similar recipe was
my first attempt of making jelly (or jam) a few years ago, when I had
just moved out from home. So if you never made some before as well:
Try it. It’s so easy !

Thanks
Lu for having me today and everbody else: Have fun cooking and
crafting!

***

Dear Fee, thanks for sharing this pretty idea! ;)

by luloveshandmade 
2 Comments
Everything Else

Vintage Dress Altering

December 9, 2011


Yessss, I love DaWanda sooo much! I just bought this vintage dress for less than 4€ and I love the pattern and the colors! As you can see, it was way too long, so I shortened it and I think it fits quite well. :) What I love most about clothes with a colorful pattern is that you can combine them with tights and leggings in every color which you can find in the dress. <3
By the way, hello to all my new readers!! :) Hope you enjoy my blog party, there are some other nice projects to come. :) Some of you may have found my blog via Stef’s beautiful blog magnoliaelectric, because today she has posted her delicious punch recipe in German and has written a short text about my blog, sooo lovely! <3
If you’re new here, read something about me to get to know what my blog is about. :)
Wish you a lovely weekend! :)
Lu

by luloveshandmade 
5 Comments
« Previous Page
Next Page »

Hello & Welcome

Hello & Welcome

I'm Lu, I'm 34 years old and I live in wonderful Berlin. I am a Content Creator and DIY enthusiast and I am the founder and editor of Luloveshandmade.com where I share colorful everyday life happiness, handletterings, tutorials and other creative content. Apart from being a Handlettering Artist and running my own indie business, I'm a Content & Communications Manager. Read more about me and my creative work or visit my business portfolio page and have fun exploring this blog.

Get Inspired

  • Luloveshandmade-Handlettering-Feminism-Feminismus-Pro-Choice-Weg-mit-219a-bunt

    Pro Choice // Weg mit Paragraf 219a!

    January 24, 2021
  • Luloveshandmade-Shop-Update-Illustration-Handlettering-Spreadshirt-1

    Luloveshandmade Shop Update – New Products with my Letterings and Illustrations via Spreadshirt

    October 19, 2020
  • Luloveshandmade-Handlettering-Illustration-Make-Periods-Table-Talk-Menstruation-Feminism

    Make Periods Table Talk

    September 11, 2020
  • Luloveshandmade-Uncle-M-Music-All-Boobs-Are-Beautiful-6

    All Boobs Are Beautiful – Special Limited Edition Shirt via Uncle M Music Shop

    July 24, 2020
  • Luloveshandmade-Free Handlettering Printable-We Will All Make It Through All Of This (1)

    Free Handlettering Printable: We’ll Make It Through This

    April 13, 2020

Tags

advice balcony berlin guide christmas cities diy fake polaroid fashion favorite blogs favorite indie label favorite restaurants and cafes favorite shops featured fellow bloggers feminism food and cooking food table freebie giveaway handlettering handmade home decoration home tour instagram instagram photo printing service life and friends list lomography longboarding makeover market news painting and drawing party photography potsdam guide pretty online finds recipe review selling sewing shopping sponsoring travel video vintage what I wore wishlist
...
Followers
Follow
...
Followers
Follow
...
Fans
Like
...
Followers
Follow
...
Posts
0
...
amazing followers

My favorite Posts

  • Handlettering Workshop Recap
    Handlettering Workshop Recap
  • A Colorful Portrait Shooting (& Advice for How to Prepare for It)
    A Colorful Portrait Shooting (& Advice for How to Prepare for It)
  • Our Sweet And Happy Croatia Adventure // Summer Holidays on Brač
    Our Sweet And Happy Croatia Adventure // Summer Holidays on Brač
  • Pinterest Basics for Bloggers
    Pinterest Basics for Bloggers
  • Handlettering for Beginners (with Pinterest) & Valentine
    Handlettering for Beginners (with Pinterest) & Valentine's Day Printables

English: Imprint // Data Protection
German: Impressum // Datenschutzerklärung

Copyright © 2025 · Prima Donna theme by Georgia Lou Studios

© 2010 - 2017 luloveshandmade · Theme by Georgia Lou Studios, adapted by kathastrophal.de.