• Home
  • About
  • Portfolio
  • Shop
  • Collaboration
  • Imprint
Bloglovin
Instagram
Pinterest
Facebook
Twitter
Contact

Luloveshandmade

Crafts, colors & everyday life happiness

  • DIY
  • Handlettering & Illustration
  • Outfits
  • Recipes
  • Parties
  • Videos
Everything Else

Zipper Sewing DIY.

January 25, 2012


Dear readers! :) As I got to know, here a few readers who are interest in a tutorial for how to sew a zipper, so I decided to make a few illustrations to make clear how this works. :) Hopefully this will help you! :)


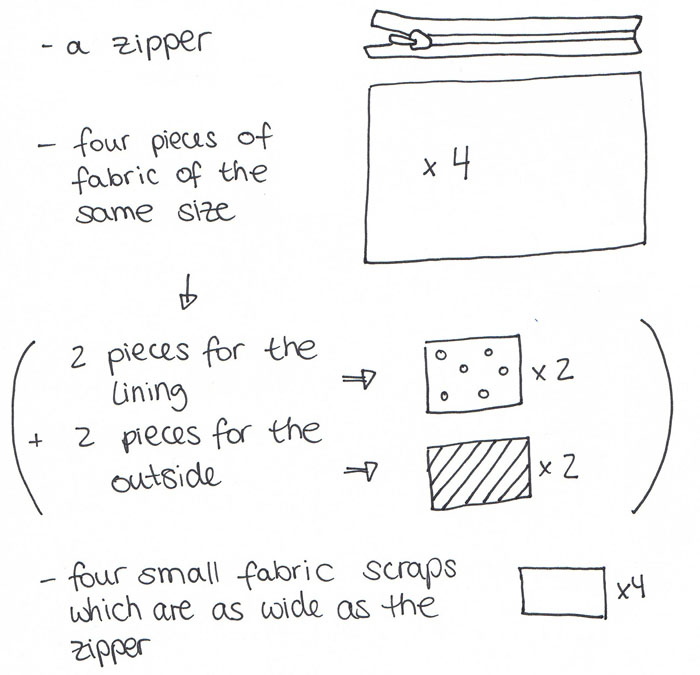
> Sew the fabric scraps onto the endings of the zipper. Each end of the zipper has to be between to layers of fabric and will thus be covered.


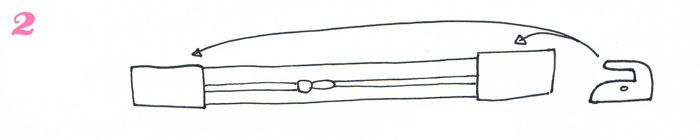
> Now iron the fabric scraps. The seam to attach them to the zipper is now hidden.


> Put the fabric right side up and pin the zipper face down onto it. Use a zipper foot for basting (therefore, use a straight stitch for sewing the zipper onto the fabric).


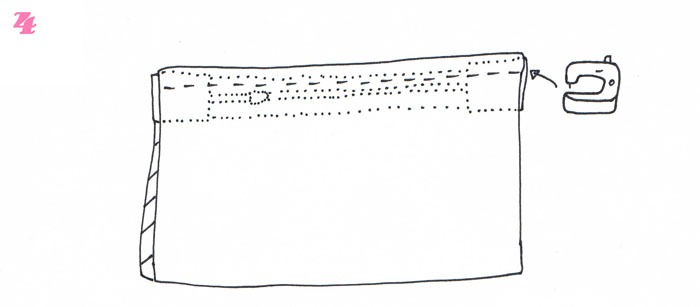
> Now you need to pin one piece of lining onto the front pieces (right sides together), the zipper is in between. Using a zipper foot, stitch the upper edges together. The dotted lines in the illustration indicate how it looks between the layers of fabric.

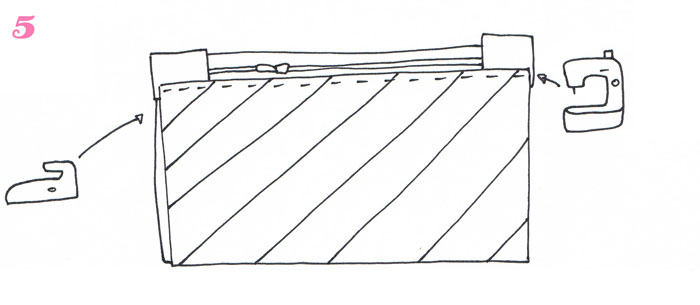
> The front piece of fabric is now turned inside out. Press the layers together and iron. Next, topstitch the upper edge of the front, attaching the fabric to the zipper.


> Do the same with the back and the back lining. After you are done with it, it should now look like on the illustration above.


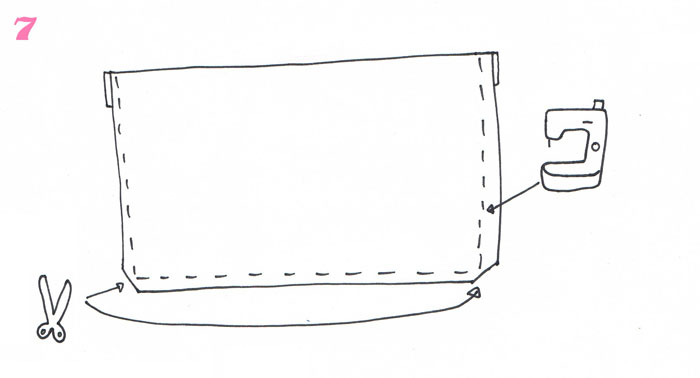
> Now you only need to put the right sides of the outer fabric onto each other. Therefore, the zipper has to be open and you need to fold the pouch in half. Pin the sides and bottom edges together and stitch the two layers together. Don’t forget to stitch back and forth over the zipper and on the ends in order to close your seam. Then use a zigzag stitch to sew the raw edges together.
Finally, do the same with the two layers of the lining. The lining’s right sides have to face each other, then you can pin them together and sew the sides and the bottoms onto each other, leaving a small seam allowance. This time when sewing the layers onto each other, you need to leave out an opening so that you can turn the bag right side out after you’ve finished sewing. Later close that opening by hand, using a blind stitch.

In case you have any questions, just let me know, I hope this tutorial is useful for some of you! :)
Lu

Merken

diy sewing
by luloveshandmade 
6 Comments

About luloveshandmade

Hello and thank you for visiting my blog! I am Lu, 33 years old, living in wonderful Berlin and am making the world bright and colorful! Let's get crafty together and enjoy the happy things in life!

View all posts by luloveshandmade

Related Posts

  • Luloveshandmade-DIY-Jewelry-Schmuck-FIMO-Polymer-Clay-Earrings-1-1Handmade Statement Earrings from Polymer Clay / FIMO
  • Luloveshandmade-DIY-Espadrilles-with-Orange-Pattern-Pilot-PINTOR-Pens-1DIY: Espadrilles with Orange Pattern
  • Luloveshandmade-DIY-Statement-Earrings-with-FIMO-leather-effect-21DIY Statement Earrings with FIMO leather-effect
  • Luloveshandmade-IKEA-hack-DIY-instruments-PILOT-PINTOR-1IKEA Hack: DIY Instruments with PILOT PINTOR Pens (and Giveaway)
previous article: Where you can also find me…
next article: Thank you for reading my blog!

Comments

  1. Katinka says: January 25, 2012 at 7:13 pm

    So eine süße Anleitung – vielen Dank dafür! Vielleicht probier ich das später gleich mal aus. Wenn, dann berichte ich natürlich.
    Liebe Grüße an dich, Katinka

    Reply
  2. kim says: January 26, 2012 at 10:11 am

    awesome. thank you. i think my technique is a bit more complicated and i can never get the ends of the zipper to look nice. i will have to try this one with the scraps to cover the ends…

    das einzige, was ich nicht so ganz verstehe, ist das am schluss zusammen nähen – also punkt 7. ich lege immer aussen auf aussen und innen auf innen und nähe quasi einmal komplett rum (mit kleinem loch im futter zum drehen natürlich). wie du das machst, verstehe ich nicht so ganz… hmm.

    Reply
  3. luloveshandmade says: January 27, 2012 at 9:38 pm

    Lieben Dank, Katinka! :) Hoffentlich hilft es Dir! :)

    Liebe Kim, so ging es mir vorher auch, bis ich diese Version gelernt hab. :) Mist, dass das Ende anscheinend doch zu wirr dagestellt / beschrieben ist, aber ich meine es so, wie Du es selbst geschrieben hast. :D

    Liebe Grüße Lu

    Reply
  4. Out on a limb says: January 29, 2012 at 2:36 pm

    Hey,

    Thanks for your sweet comment on my blog. I love your illustrations. Do you draw them yourself?

    missyellowshoes.blogspot.com

    Reply
  5. Goldengelchen says: March 20, 2012 at 3:15 pm

    Hallo Lu,
    irgendwie versteh ich die Schritte 1+2 mit den kleinen Stückchen Stoff für die Enden des RV nicht.
    Wie rum müssen sie angenäht werden, dass man sie nachher so bügeln kann, dass man die Nähte nicht sieht? Ein Foto würde das vielleicht mehr verdeutlichen :)
    ***
    Ah, wenn man die Frage schreibt, wirds einem doch klarer. Zur Sicherheit:
    Man näht den Stoff mit der schönen (rechte) Seite zum RV (Oberseite) hin fest. Und dann klappt und bügelt man den Stoff nach außen hin um, so dass die schöne Seite nach oben zeigt??
    Liebe Grüße und schonmal danke!
    Denise

    Reply
  6. Luis says: April 30, 2012 at 6:26 pm

    acerola cherry

    replicas de relogiosawesome. thank you. i think my technique is a bit more complicated and i can never get the ends of the zipper to look nice. i will have to try this one with the scraps to cover the ends

    Reply

Leave Your Comments Cancel reply

Your email address will not be published. Required fields are marked *

Hello & Welcome

Hello & Welcome

I'm Lu, I'm 34 years old and I live in wonderful Berlin. I am a Content Creator and DIY enthusiast and I am the founder and editor of Luloveshandmade.com where I share colorful everyday life happiness, handletterings, tutorials and other creative content. Apart from being a Handlettering Artist and running my own indie business, I'm a Content & Communications Manager. Read more about me and my creative work or visit my business portfolio page and have fun exploring this blog.

Get Inspired

  • Luloveshandmade-Handlettering-Feminism-Feminismus-Pro-Choice-Weg-mit-219a-bunt

    Pro Choice // Weg mit Paragraf 219a!

    January 24, 2021
  • Luloveshandmade-Shop-Update-Illustration-Handlettering-Spreadshirt-1

    Luloveshandmade Shop Update – New Products with my Letterings and Illustrations via Spreadshirt

    October 19, 2020
  • Luloveshandmade-Handlettering-Illustration-Make-Periods-Table-Talk-Menstruation-Feminism

    Make Periods Table Talk

    September 11, 2020
  • Luloveshandmade-Uncle-M-Music-All-Boobs-Are-Beautiful-6

    All Boobs Are Beautiful – Special Limited Edition Shirt via Uncle M Music Shop

    July 24, 2020
  • Luloveshandmade-Free Handlettering Printable-We Will All Make It Through All Of This (1)

    Free Handlettering Printable: We’ll Make It Through This

    April 13, 2020

Tags

advice balcony berlin guide christmas cities diy fake polaroid fashion favorite blogs favorite indie label favorite restaurants and cafes favorite shops featured fellow bloggers feminism food and cooking food table freebie giveaway handlettering handmade home decoration home tour instagram instagram photo printing service life and friends list lomography longboarding makeover market news painting and drawing party photography potsdam guide pretty online finds recipe review selling sewing shopping sponsoring travel video vintage what I wore wishlist
...
Followers
Follow
...
Followers
Follow
...
Fans
Like
...
Followers
Follow
...
Posts
0
...
amazing followers

My favorite Posts

  • Handlettering Workshop Recap
    Handlettering Workshop Recap
  • Handlettering for Beginners (with Pinterest) & Valentine
    Handlettering for Beginners (with Pinterest) & Valentine's Day Printables
  • Pinterest Basics for Bloggers
    Pinterest Basics for Bloggers
  • A Colorful Portrait Shooting (& Advice for How to Prepare for It)
    A Colorful Portrait Shooting (& Advice for How to Prepare for It)
  • Our Sweet And Happy Croatia Adventure // Summer Holidays on Brač
    Our Sweet And Happy Croatia Adventure // Summer Holidays on Brač

English: Imprint // Data Protection
German: Impressum // Datenschutzerklärung

Copyright © 2025 · Prima Donna theme by Georgia Lou Studios

© 2010 - 2017 luloveshandmade · Theme by Georgia Lou Studios, adapted by kathastrophal.de.