• Home
  • About
  • Portfolio
  • Shop
  • Collaboration
  • Imprint
Bloglovin
Instagram
Pinterest
Facebook
Twitter
Contact

Luloveshandmade

Crafts, colors & everyday life happiness

  • DIY
  • Handlettering & Illustration
  • Outfits
  • Recipes
  • Parties
  • Videos
Everything Else

My first patchwork project – a sewing tutorial.

February 7, 2012


Hello eveyone, thank you for the lovely birthday wishes!! :) I’ll share some photos soon. :)
Here’s a tutorial for a patchwork book cover. I have a new sketchbook where I sort and keep inspiration and make sketches for future DIY projects. Since black is not my favourite color, I wanted the book to look friendly and colorful and here’s how I sewed the cover. :) You only need a book, some fabric scraps which are big enough to cover the book, a larger piece of fabric which is a bit bigger than the book itself, a sewing machine and sewing supplies.


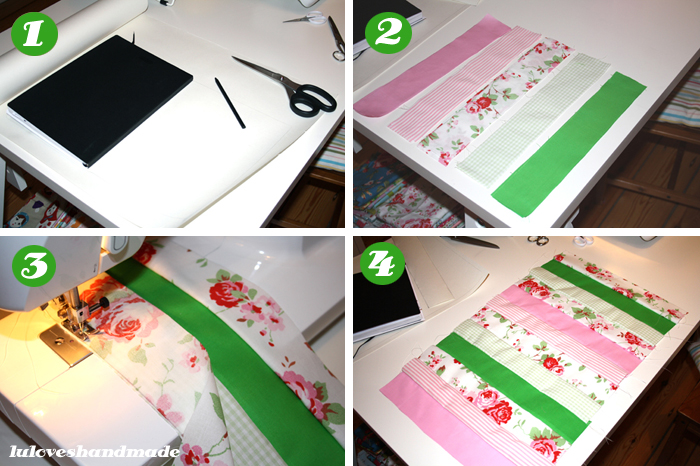
1. Take some paper and make a draft of the cover. Therefore, put the book onto the paper, draw its outline onto the paper and leave some margins and make it wider so that you can fold it around the book.
2. Cut out fabric scraps.
3. Sew the scraps next to each other.
4. It should now look like this, you should now have a huge piece of fabric which is slightly bigger and wider than your book.


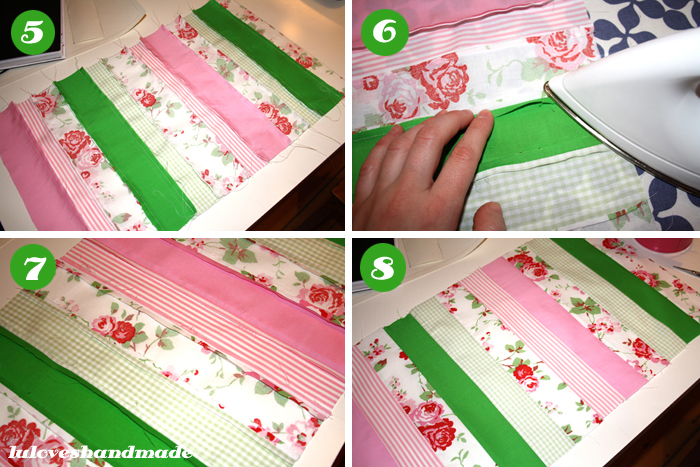
5. This is how the left side looks.
6. Now you have to iron the back so that the seams are neat.
7. The back now looks like this.
8. That’s the front.


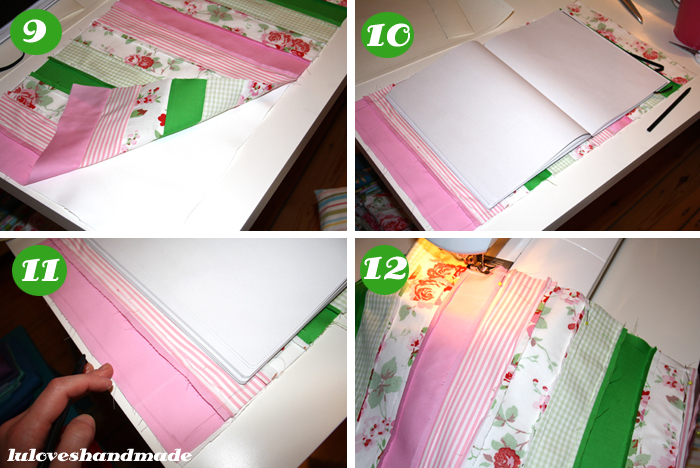
9. Now cut out the other piece of fabric for the ‘inside’ (you won’t see it later, but using a secong layer of fabric or some lining makes the cover look prettier) which is as big as your patchwork piece. Put the two layers onto each other, right sides facing.
10. Put the book onto the layers in order to find out where to sew and how wide the seam allowances have to be.
11. Draw the line where you want to sew, leave a small seam allowance and make sure to make it wider at the sides of the book so that you can fold it around.
12. Now sew the two layers onto each other and leave an opening at one side so that you can later turn the fabric inside out.


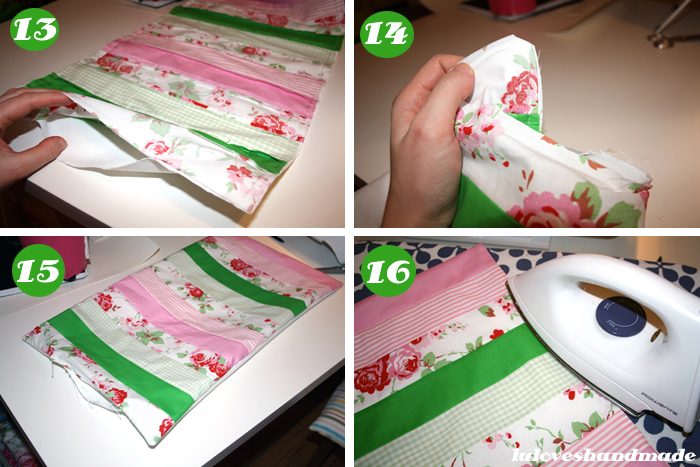
13. Here’s the opening, just big enough to turn the fabric inside out.
14. Cut off the corners (but be careful not to cut into the seam).
15. Turn the fabric inside out.
16. Now iron the edges.


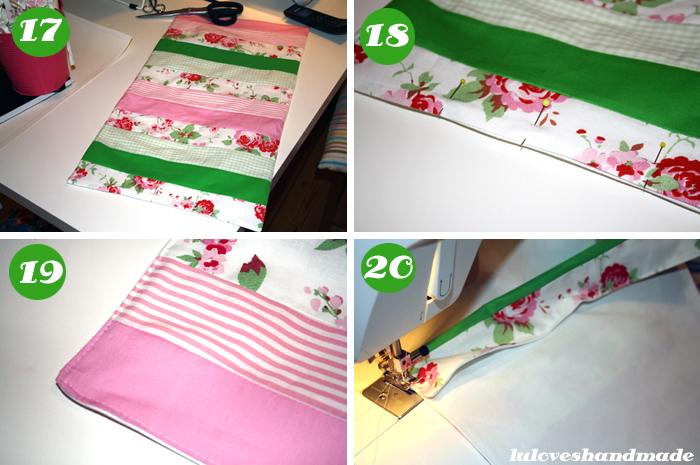
17. This is how it should be looking.
18. Close the opening with pins.
19. Top stitch around the whole book cover and close the opening.
20. Finally, fold around the sides, fitting them to the book and adjusting them to the book’s size.


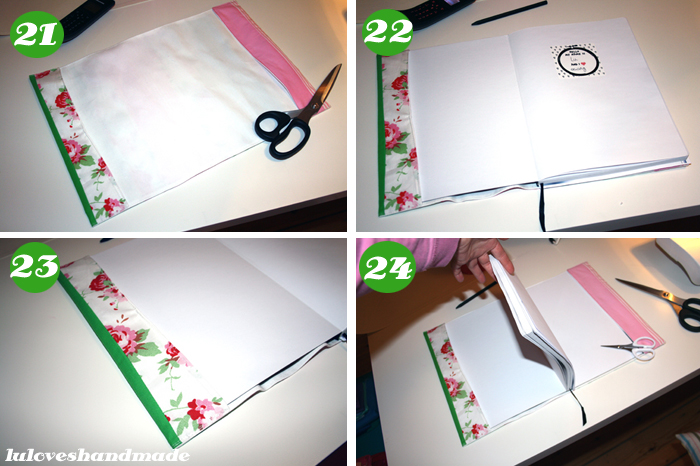
21. That’s it! :) You can now put the book inside the cover.
22.-24. Hasn’t the cover become pretty? :)


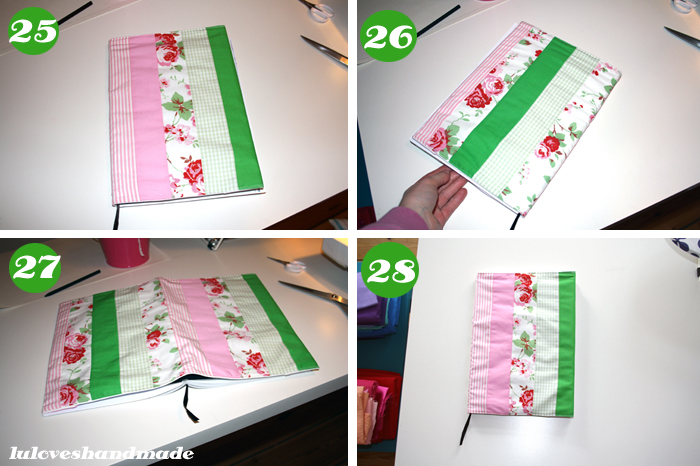
25.-28. I love my new book cover! :) Are you gonna try to make one yourself? :)

Merken

Merken

diy handmade sewing
by luloveshandmade 
6 Comments

About luloveshandmade

Hello and thank you for visiting my blog! I am Lu, 33 years old, living in wonderful Berlin and am making the world bright and colorful! Let's get crafty together and enjoy the happy things in life!

View all posts by luloveshandmade

Related Posts

  • Luloveshandmade-DIY-Jewelry-Schmuck-FIMO-Polymer-Clay-Earrings-1-1Handmade Statement Earrings from Polymer Clay / FIMO
  • Luloveshandmade-DIY-Espadrilles-with-Orange-Pattern-Pilot-PINTOR-Pens-1DIY: Espadrilles with Orange Pattern
  • Luloveshandmade-DIY-Statement-Earrings-with-FIMO-leather-effect-21DIY Statement Earrings with FIMO leather-effect
  • Luloveshandmade-IKEA-hack-DIY-instruments-PILOT-PINTOR-1IKEA Hack: DIY Instruments with PILOT PINTOR Pens (and Giveaway)
previous article: This is the date I love most about each year… :)
next article: The birthday lady.

Comments

  1. Liselotte Arty Farty says: February 7, 2012 at 1:39 pm

    Sehr schick! Auch Notizbücher brauchen ein passendes Gewand.

    Ich hätte eine Frage, könntest du mir bitte die URL deines Buttons zusenden? Möchte auf meinem Blog auch sowas integrieren, aber das Link-Kästchen darunter sieht bei mir so riesig aus, deines hingegen, wäre perfekt!

    Reply
  2. Roboti und da Höm says: February 7, 2012 at 2:14 pm

    Eine wunderbare Anleitung!

    Reply
  3. lottapeppermint says: February 7, 2012 at 3:44 pm

    Eine sehr schöne Anleitung – und eine tolle Buchhülle!!

    Reply
  4. Steffi says: February 7, 2012 at 6:27 pm

    Gefällt mir sehr gut! Viel schöner als das schwarze Buch… :-)

    Reply
  5. Vivienne says: February 9, 2012 at 7:57 pm

    Oh, so einen Buchschutz brauche ich auch eigentlich ganz unbedingt und Deiner hier ist auch noch so schön! Aber ohne Nähmaschine kein DIY. :-( Liebste Grüße, Vivienne

    Reply
  6. luloveshandmade says: February 11, 2012 at 3:07 pm

    Liebe Liselotte, wie meinst Du das, was soll ich Dir schicken? :) Meinst Du den Code für mein Widget? Denn der ist ja links in der Sidebar. Oder was meintest Du? :)

    Danke, ihr Lieben!

    Schade, dass Du keine Nähmaschine hast, Vivi, dann muss mal eine her! :)

    Reply

Leave Your Comments Cancel reply

Your email address will not be published. Required fields are marked *

Hello & Welcome

Hello & Welcome

I'm Lu, I'm 34 years old and I live in wonderful Berlin. I am a Content Creator and DIY enthusiast and I am the founder and editor of Luloveshandmade.com where I share colorful everyday life happiness, handletterings, tutorials and other creative content. Apart from being a Handlettering Artist and running my own indie business, I'm a Content & Communications Manager. Read more about me and my creative work or visit my business portfolio page and have fun exploring this blog.

Get Inspired

  • Luloveshandmade-Handlettering-Feminism-Feminismus-Pro-Choice-Weg-mit-219a-bunt

    Pro Choice // Weg mit Paragraf 219a!

    January 24, 2021
  • Luloveshandmade-Shop-Update-Illustration-Handlettering-Spreadshirt-1

    Luloveshandmade Shop Update – New Products with my Letterings and Illustrations via Spreadshirt

    October 19, 2020
  • Luloveshandmade-Handlettering-Illustration-Make-Periods-Table-Talk-Menstruation-Feminism

    Make Periods Table Talk

    September 11, 2020
  • Luloveshandmade-Uncle-M-Music-All-Boobs-Are-Beautiful-6

    All Boobs Are Beautiful – Special Limited Edition Shirt via Uncle M Music Shop

    July 24, 2020
  • Luloveshandmade-Free Handlettering Printable-We Will All Make It Through All Of This (1)

    Free Handlettering Printable: We’ll Make It Through This

    April 13, 2020

Tags

advice balcony berlin guide christmas cities diy fake polaroid fashion favorite blogs favorite indie label favorite restaurants and cafes favorite shops featured fellow bloggers feminism food and cooking food table freebie giveaway handlettering handmade home decoration home tour instagram instagram photo printing service life and friends list lomography longboarding makeover market news painting and drawing party photography potsdam guide pretty online finds recipe review selling sewing shopping sponsoring travel video vintage what I wore wishlist
...
Followers
Follow
...
Followers
Follow
...
Fans
Like
...
Followers
Follow
...
Posts
0
...
amazing followers

My favorite Posts

  • Handlettering Workshop Recap
    Handlettering Workshop Recap
  • A Colorful Portrait Shooting (& Advice for How to Prepare for It)
    A Colorful Portrait Shooting (& Advice for How to Prepare for It)
  • Pinterest Basics for Bloggers
    Pinterest Basics for Bloggers
  • Handlettering for Beginners (with Pinterest) & Valentine
    Handlettering for Beginners (with Pinterest) & Valentine's Day Printables
  • Our Sweet And Happy Croatia Adventure // Summer Holidays on Brač
    Our Sweet And Happy Croatia Adventure // Summer Holidays on Brač

English: Imprint // Data Protection
German: Impressum // Datenschutzerklärung

Copyright © 2025 · Prima Donna theme by Georgia Lou Studios

© 2010 - 2017 luloveshandmade · Theme by Georgia Lou Studios, adapted by kathastrophal.de.